Figure 6.1 - CarCounter
***
new and constructors;
Random class;
Here is an analogy: reading a book - whatever the book - involves opening it at the front, reading a page, then moving to the next page. We know what to do with a book. It is the same with objects. When you have used a few of them, you know what to look for when presented with a new one.
int, and double to declare
local variables within methods. But local variables alone are insufficient
to tackle most problems.
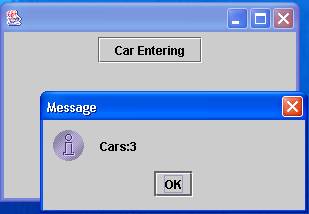
Here we introduce a program (CarCounter, figure 6.1) to assist in the
running of a car park (or parking lot). It provides a single button, which
the attendant clicks when a car enters. The program keeps a count of the
number of cars in the park, and displays it in a message dialog.
Figure 6.1 - CarCounter
In essence, we need to add 1 to a variable (which we will name carCount)
in the actionPerformed method associated with the button-click. However,
it is important to note that a local variable (declared within the
actionPerformed method) will not work. Local variables are
temporary - they are created when a method is entered, and destroyed when
the method finishes. Any values they hold are not preserved.
Here is the correct code, with the user-interface parts removed for clarity:
public class CarCounter extends JFrame
    implements ActionListener {

    private int carCount = 0;


    public void actionPerformed(ActionEvent event) {
        carCount = carCount + 1;
        JOptionPane.showMessageDialog(null, "Cars:" + carCount);
    }
}
The point at issue here is the declaring of the carCount variable.
carCount is declared outside the method, but
inside the class CarCounter. It can be used by any method
of the class (though here, we only use it in actionPerformed).
private, meaning that any other classes we might
have cannot use it. The variable is encapsulated or sealed up inside
CarCounter, i.e. it is for the use of the methods of CarCounter only.
carCount is an example of an instance variable. It belongs to an
instance of a class, rather than to one method. Another term is 'class-
level' variable.
carCount is said to have class scope. The scope of an item is the
area of the program in which it can be used. The other type of scope we have
seen is local scope used with local variables declared inside methods.
private.
public class SomeClass {

    private int n = 8;

    private void myMethod() {
        int n;
        n = 3;         //which n?
    }

    //other methods, omitted here
}
Although both variables are accessible (in scope) within myMethod, the rule
is that the local variable is chosen. The instance variable (class-level)
n remains set to 8.
SomeClass class, what are the consequences of deleting the local
declaration of n?
Instance variables are essential, but you should not ignore locals. For example, if a variable is used inside one method only, and need not keep its value between method calls, make it local.
Here is the complete CarCounter program, with the user-interface code as
well.
import java.awt.*;
import java.awt.event.*;
import javax.swing.*;
public class CarCounter extends JFrame
    implements ActionListener {

    private int carCount = 0;

    private JButton button;

    public static void main(String[] args) {
        CarCounter frame = new CarCounter();
        frame.setSize(300, 200);
        frame.createGUI();
        frame.show();
    }

    private void createGUI() {
        setDefaultCloseOperation(EXIT_ON_CLOSE);
        Container window = getContentPane();
        window.setLayout(new FlowLayout());

        button = new JButton("Car Entering");
        window.add(button);
        button.addActionListener(this);
    }

    public void actionPerformed(ActionEvent event) {
        carCount = carCount + 1;
        JOptionPane.showMessageDialog(null, "Cars:" + carCount);
    }
}
Do not be tempted to amend the user-interface code for now. It must be
exactly as shown.
Now that we have introduced private scope, let us apply this to the user
interface coding. Items on a window - such as buttons - need to be there for
the life of the program. In addition, they are often used by several
methods. For these reasons, they are declared as instance variables, outside
any methods. You can see this at work in the CarCounter class, where a
button is declared by:
private JButton button;in the same area of code as the
carCount variable. We shall return to the
issue of user-interface classes later in this chapter.
private int x = 0;

public void actionPerformed(ActionEvent event) {
    Graphics paper = panel.getGraphics();
    paper.drawLine(x, 0, x, 100);
    x = x + 10;
}
new
int and double types.
These are regarded as 'built-in' or 'primitive' types - they are not
instances of classes (i.e. not objects). Recall that we can declare them and
provide an initial value, as in:
int n = 3;In effect we are saying 'make me a new integer named
n, with an initial
value of 3'.
However, you have used other kinds of items (such as buttons and graphics
drawing areas). They are instances of classes. We have to create
them in a special way, using the word new. Creating an instance with new
is known as instantiation.
To illustrate the use of new, we will study the Random class.
Random class
Random class provide us with a 'stream' of random numbers which we
can obtain one-at-a-time via the nextInt method. Here is a program
(RandomLines) which draws a random line each time we click the button. One
end of the line is fixed at (0, 0), and the other end of the line has a
random x and y position. Prior to drawing the line, we clear the drawing
area by drawing a white rectangle which fills the drawing area (100 by
100 here) then we set the colour to black. Figure 6.2 shows a screenshot,
and here is the code:
import java.awt.*;
import java.awt.event.*;
import javax.swing.*;
import java.util.*;

public class RandomLines extends JFrame
    implements ActionListener {

    private Random randomPositions = new Random();
    private JButton button;
    private JPanel panel;

    public static void main(String[] args) {
        RandomLines frame = new RandomLines();
        frame.setSize(150, 200);
        frame.createGUI();
        frame.show();
    }

    private void createGUI() {
        setDefaultCloseOperation(EXIT_ON_CLOSE);
        Container window = getContentPane();
        window.setLayout(new FlowLayout() );

        panel = new JPanel();
        panel.setPreferredSize(new Dimension(100,100));
        panel.setBackground(Color.white);
        window.add(panel);

        button = new JButton("Press me");
        window.add(button);
        button.addActionListener(this);
    }

    public void actionPerformed(ActionEvent event) {
        int xEnd, yEnd;
        Graphics paper = panel.getGraphics();

        paper.setColor(Color.white);
        paper.fillRect(0, 0, 100, 100);
        paper.setColor(Color.black);

        xEnd = randomPositions.nextInt(100);
        yEnd = randomPositions.nextInt(100);
        paper.drawLine(0, 0, xEnd, yEnd);

    }
}
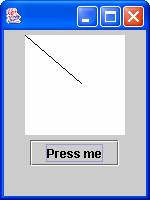
Figure 6.2 - random lines
To use Random in a convenient way, we need this import instruction:
import java.util.*;If we omitted the import, we would have to refer to the class as:
java.util.RandomThe use of
import provides us with a shorthand.
We must then declare and initialise an instance of our class. This can be
done in two ways. One approach is to use a single statement, as in
private Random randomPositions = new Random();
Note that:
private scope, rather than local scope.
private, we state the class of item we are declaring. Here, the
item is an instance of the Random class.
randomPositions for our instance. Other suitable names
for our instance might have been randomNumbers, random. Note the
possibility of using random as the name of an instance. Java is case-
sensitive, and the convention is that all class names begin with a capital
letter. Thus, random (with a lower-case letter) can be used for an
instance name. In a program where we only create one instance from a class,
it is common to use the same name as the class (but with a lower-case first
letter). In this example, randomPositions conveys the meaning. We have
used the plural because our instance can provide as many random numbers as we
request.
new precedes the use of the constructor, which is basically a
method with the same name as the class: Random. The use of new creates a
new instance of a class in RAM, which is assigned to randomPositions.
Random has two constructors with differing parameters, and the one with no parameters
is suitable here.
private Random randomPositions...and
... = new Random();The first part declares
randomPositions as a variable of class Random,
but it does not yet have a concrete instance associated with it. The
second part calls the constructor of the Random class to complete the task
of declaring and initialisation.
public  class RandomLines extends JFrame
    implements ActionListener {

    private Random randomPositions;

    ...

    private void someMethod() {
        randomPositions = new Random();
        ...

    }
}
Whichever approach we choose, there are a number of points:
Random.
randomPositions has class scope - it can be used by any method of the
RandomLines class, rather than being local to a method.
randomPositions is private. It cannot be used by other classes outside our
RandomLines class. Normally we make all such instance variables private.
public class SomeClass extends JFrame
     implements ActionListener {

    private Random r;
    r = new Random();
    ...
private Random r = new Random();
Let us return to the RandomLines program. So far, we have created an
object, i.e. an instance of the Random class named randomPositions. We
have yet to create any actual random numbers.
Once an object has been created with new, we can use its methods. The
documentation tells us that there are several methods which provide us with a
random number, and we chose to use the method which provides integers, and
which lets us specify the range of the numbers. The method is named
nextInt (in the sense of fetching the next random number from a sequence
of numbers). In our program, we put:
xEnd = randomPositions.nextInt(100);
yEnd = randomPositions.nextInt(100);
The range of random numbers (100 here) was chosen to be suitable for the
size of the drawing area.
To summarize, we declare an instance of the appropriate class (Random
here), and use new to create and initialise it. These two stages can be
combined, or separated; it depends on the particular program you are working
on. Then we use the nextInt method of the instance.
Random class. We will look at its
constructors and its most useful methods.
Firstly, there are two constructors. Above, we used the one with no
parameters. However, the constructor is overloaded: there is another version
with a single long parameter. (long is a larger version of int.) Here
are the two constructors in use:
private Random random = new Random();
private Random randomSame = new Random(1000);
The first version produces a different random sequence every time we run the program. The second version derives the random sequence from the number we supply - which can be any value. In this case the same random sequence occurs every time. We might use this second form if we wanted to perform many test runs with the same sequence.
Figure 6.3 shows the most useful methods.
nextInt(int n) |
Returns an int value
>= 0, and < n |
nextDouble | This has no parameters.
It returns a double
value >= 0.0, and < 1.0 |
Let us consider the nextInt method in more detail. In the RandomLines
program, we put:
xEnd = randomPositions.nextInt(100);
yEnd = randomPositions.nextInt(100);
This will produce a random value in the range 0 to 99. The value 100
will never occur. This is because the specification of nextInt used 'less
than' rather than 'less than or equal to'. This is a common cause of
programming errors, because most problems are stated with inclusive ranges,
as in 'the throw of a die results in a number from 1 to 6', or 'playing
cards are numbered from 2 to 10, excluding aces'. Similar warnings also
apply to nextDouble, which will never produce a value of exactly
1.0.
Here we will write a method which simplifies the use of random numbers. It
has two parameters, letting us specify the minimum and maximum inclusive
values of our numbers. here is the code:
private int randomInRange(int min, int max) {
    return min+random.nextInt(max-min+1);
}
To simulate the throw of a die, we might put:
int lucky;
lucky = randomInRange(1, 6);
When you use a class, it is important to understand the facilities provided
by its methods and constructors. Sometimes, the documentation that comes
with Java systems is rather hard to understand, so in appendix A we summarise
all the classes that we use throughout the book.
randomInRange to obtain a random age in the range 16
to 59 inclusive?
int age = randomInRange(16, 59);
main method and new
new in creating a new instance of a class,
which we then use via its methods. However, if you step back from the detail
of your programs, you will see that they are all classes, taking the form:
public class SomeName ... {

    private declarations...

    a series of methods...

}
Informally, we have talked about 'writing a program' but in fact we should
say 'writing a class'. But is the program a class, or an instance of a
class?
Recall that the main method is called automatically by the Java system
before anything else happens. Look at the instructions in any of our main
methods. Its first task is to use new to create an instance of the class
which contains it.
We will continue to talk about programs, as this is more natural. To answer
our question about programs and classes: a running program is an instance of
a class. The new takes place in the main method.
To improve the situation, a set of components was written in Java which
provided more facilities, and which looked identical on any platform. The
classes were referred to as the Swing toolkit. You have used the JButton
class often - the J indicates that the class was written in Java.
Though Swing provides more power, we still need parts of the old AWT, as you
will see from the import instructions we place at the top of our programs.
Random and saw how to create new instances and
manipulate these instances with their methods. We follow this approach for
many classes. However, there are other classes - such as JButton - which
are different, because they involve events. We shall look at this class in
detail, and then generalise the use of classes, to enable you to use any
other classes you encounter.
We have used events in many of the programs you have seen. We provided a
button, and code was placed in the actionPerformed method to respond to the
event. Here we will cover events in more detail.
In Java, events are split into categories. For example, we have:
CarCounter program, and locate the line:
public class CarCounter extends JFrame
    implements ActionListener {
The extends keyword expresses inheritance, which we cover in chapter 10.
The implements keyword can be used to provide event-handling. Here is an
analogy. Assume you have a SuperCredit card, and you see a sign outside a
shop stating that SuperCredit cards are accepted. You assume that when you
make a purchase, the shop will provide the facilities you need, such as a
suitable machine to process your card. In other words, the shop implements
the SuperCredit interface. We cover interfaces in Chapter 23.
When we use implements ActionListener, we are stating that our program
implements the ActionListener interface. This requires that we provide a
method named actionPerformed, which will be called when an action event
happens - such as the click on a button.
In addition we have to register the program as a 'listener' for types of event. This is covered below.
JButton
Random, we must declare and initialise the object before using it. In
addition, we must implement the ActionListener interface, and register as a
listener for action events. Here again is the CarCounter program, which we
will study.
import java.awt.*;
import java.awt.event.*;
import javax.swing.*;
public class CarCounter extends JFrame
    implements ActionListener {

    private int carCount = 0;

    private JButton button;

    public static void main(String[] args) {
        CarCounter frame = new CarCounter();
        frame.setSize(300, 200);
        frame.createGUI();
        frame.show();
    }

    private void createGUI() {
        setDefaultCloseOperation(EXIT_ON_CLOSE);
        Container window = getContentPane();
        window.setLayout(new FlowLayout());

        button = new JButton("Car Entering");
        window.add(button);
        button.addActionListener(this);
    }

    public void actionPerformed(ActionEvent event) {
        carCount = carCount + 1;
        JOptionPane.showMessageDialog(null, "Cars:" + carCount);
    }
}
Here is the process:
ActionListener interface:
public class CarCounter extends JFrame
    implements ActionListener {
This requires us to write a method named actionPerformed, as shown.
private JButton button;
createGUI. The initialisation is:
button = new JButton("Car Entering");
Container class,
which we have named window:
window.add(button);
Note that add is a method of window, not of button. The add method
places the items on the screen in left-to-right order. Items in a row are
centered. A new row of objects is automatically begun when a row is
filled. (This layout scheme is known as 'flow layout'. There is another
scheme known as 'border layout', which is discussed in Appendix A.)
button.addActionListener(this);
public void actionPerformed(ActionEvent event) {
There are some arbitrary things we chose in the program, for example:
JButton instance - we chose button;
Car Entering;
There are some essential unchangeable parts of the program:
import instructions;
implements actionListener;
actionPerformed method;
addActionListener to register as a button listener;
main method, and the parts of createGUI which set up the closing of
the outer frame and the layout of the objects.
clickPerformed.
Random class and the JButton class can
be incorporated into programs. Now we are in a position to step back and
provide some general guidelines. Following these, we will apply them to the
JLabel, JTextField, JSlider, JPanel, and Timer classes.
Here is the approach.
JSlider covered below).
new.
implements, registering, and listener methods.
new, use it via its
methods.
Now we will examine other useful classes. There are no new facilities of Java required - we have seen how to incorporate classes and create instances. However, these classes are very useful, and appear in many of the following chapters.
JLabel
JLabel lets us display non-changing text, such as user instructions or
prompts. For text that will change - such as the result from a calculation
- we would use a JTextField. The SumTextFields program (figure 6.4)
shows it in use, displaying the fixed = character. Let us examine its
use.
equalsLabel = new JLabel(" = ");
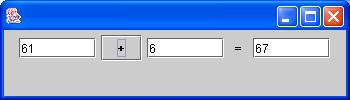
Figure 6.4 - sum of text fields
Here is the code of SumTextFields, which adds two values when the +
button is clicked.:
import java.awt.*;
import java.awt.event.*;
import javax.swing.*;

public class SumTextFields extends JFrame
    implements ActionListener {

    private JTextField number1Field, number2Field, sumField;
    private JLabel equalsLabel;
    private JButton plusButton;

    public static void main(String[] args) {
        SumTextFields frame = new SumTextFields();
        frame.setSize(350, 100);
        frame.createGUI();
        frame.show();
    }

    private void createGUI() {
        setDefaultCloseOperation(EXIT_ON_CLOSE);
        Container window = getContentPane();
        window.setLayout(new FlowLayout());

        number1Field = new JTextField(7);
        window.add(number1Field);

        plusButton = new JButton("+");
        window.add(plusButton);
        plusButton.addActionListener(this);

        number2Field = new JTextField(7);
        window.add(number2Field);

        equalsLabel = new JLabel("  =  ");
        window.add(equalsLabel);

        sumField = new JTextField(7);
        window.add(sumField);
    }

    public void actionPerformed(ActionEvent event) {
        int number1 = Integer.parseInt(number1Field.getText());
        int number2 = Integer.parseInt(number2Field.getText());
        sumField.setText(Integer.toString(number1 + number2));
    }
}
JTextField
JTextField class provides a single-line area which can be used to
display text, or to input text. Let us examine its use:
ActionListener,
and provide an actionPerformed method. In our example, we will use a
button-click rather than the 'enter' key to initiate the calculation.
textField1 = new JTextField(15);
textField2 = new JTextField("Hello!", 15);
The first one creates an empty text field with the specified width (in terms
of characters), and the second one also lets us set up some initial text.
Note that the default font of text fields is proportional, so m occupies
more space than l. The width of a text field is based on the size of an
m.
setText and getText
methods, as in:
String s;
s = textField1.getText();
textField1.setText(s);
SumTextFields program, the user enters two integers into the text
fields at the left. When the button is clicked, the sum is displayed in the
third text field. Recall our use of input dialogs for inputting numbers,
in Chapter 4. Again, we need to convert the string entered in the text field
into an integer, and we need to convert our integer result into a string in
order to display it. We use Integer.parseInt and
Integer.toString. Here is the code:
int number1 = Integer.parseInt(number1Field.getText());
int number2 = Integer.parseInt(number2Field.getText());
sumField.setText(Integer.toString(number1 + number2));
The purpose of the program is to illustrate labels and text fields. but it
is by no means perfect. Consider the problem of incorporating a Clear
button, which stores an empty string "" in each text
field when clicked. The difficulty is that every button-click is dealt with
by the actionPerformed method, and (with what you know so far) it is
impossible to distinguish between them. In Chapter 7, we show the use of the
if statement, which we can place in an actionPerformed method.
Effectively this allows us to say:
if the "+" button caused the event, do the sum.
if the "Clear" button caused the event, clear the text
fields.
CarCounter program so that the count is displayed in a text
field rather than a message dialog.
SumTextFields program. A suitable name is countField. Rather than
displaying the answer in a message dialog, we put:
countField.setText(Integer.toString(carCount));
JPanel
Here is the standard code we use to create a panel with a specified size:
panel = new JPanel();
panel.setPreferredSize(new Dimension(200, 200));
panel.setBackground(Color.white);
window.add(panel);
To use the panel as a drawing area rather than a container for other
objects, we use:
Graphics paper = panel.getGraphics();
Timer
actionPerformed method.
Timer classes, in these
libraries:
java.util
javax.swing
We require the one in the Swing library. If we import every class from each library, then try to declare an instance of class
Timer, a compilation
error occurs. Here is how we can resolve the conflict:
javax.swing.
If the program doesn't need the java.util library, there
is no problem. We declare a timer with:
private Timer timer;
Raindrops program below)
then we can declare a timer using:
private javax.swing.Timer timer;
we must use this long form every time we use the class name Timer.
implements ActionListener
and provide an actionPerformed method.
this. Here is an example:
timer = new Timer(1000, this);
start and stop methods.
setDelay, as
in:
timer.setDelay(500);
TimerExample) which displays minutes and seconds on the
screen. Figure 6.5 shows the screenshot, and here is the code.
import java.awt.*;
import java.awt.event.*;
import javax.swing.*;

public class TimerExample extends JFrame
    implements ActionListener {

    private JTextField secsField, minsField;
    private JLabel secsLabel, minsLabel;
    private int ticks = 0;
    private Timer timer;

    public static void main (String[] args) {
        TimerExample frame = new TimerExample();
        frame.setSize(300,100);
        frame.createGUI();
        frame.show();
    }

    private void createGUI() {
        setDefaultCloseOperation(EXIT_ON_CLOSE);
        Container window = getContentPane();
        window.setLayout(new FlowLayout() );

        minsLabel = new JLabel("Mins:  ");
        window.add(minsLabel);

        minsField = new JTextField(2);
        window.add(minsField);

        secsLabel = new JLabel("    Secs:   ");
        window.add(secsLabel);

        secsField = new JTextField(2);
        window.add(secsField);
        timer = new Timer(1000, this);
        timer.start();
    }

    public void actionPerformed(ActionEvent event) {
        minsField.setText(Integer.toString(ticks / 60));
        secsField.setText(Integer.toString(ticks % 60));
        ticks = ticks + 1;
    }

}
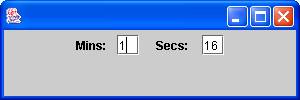
Figure 6.5 timer example
We create a timer with an event every second (1000 milliseconds). The
event-handling involves:
ticks) to count the number of ticks;
60;
% to prevent the seconds display from exceeding 59;
ticks variable cannot be local.
ticks were local, the count
would not be maintained.
JSlider
Raindrops program in figure
6.6. Here are the main points.
javax.swing.event library for
event-handling.
implements ChangeListener,
and provide an event-handling stateChanged method.
JSlider.VERTICAL
or JSlider.HORIZONTAL;
getValue method;
stateChanged method is called when the user moves the knob. Several
events will be created as the knob is dragged, but the final call will occur
when the user settles on a value.
Raindrops, and figure 6.6 shows its screenshot.
import java.awt.*;
import java.awt.event.*;
import javax.swing.*;
import javax.swing.event.*;
import java.util.*;

public class Raindrops extends JFrame implements
    ActionListener, ChangeListener {

    private JPanel panel;
    private Random random;
    private javax.swing.Timer timer;
    private JSlider slider;
    private JTextField gapField;
    private JLabel gapLabel;

    public static void main (String[] args) {
        Raindrops frame = new Raindrops();
        frame.setSize(250, 300);
        frame.createGUI();
        frame.show();
    }

    private void createGUI() {
        setDefaultCloseOperation(EXIT_ON_CLOSE);
        Container window = getContentPane();
        window.setLayout(new FlowLayout() );
        random = new Random();

        panel = new JPanel();
        panel.setPreferredSize(new Dimension(200, 200));
        panel.setBackground(Color.white);
        window.add(panel);

        gapLabel = new JLabel("Time Gap:  ");
        window.add(gapLabel);
        gapField = new JTextField(10);
        window.add(gapField);

        slider = new JSlider(JSlider.HORIZONTAL, 200, 2000, 1000);
        window.add(slider);
        slider.addChangeListener(this);
        gapField.setText(Integer.toString(slider.getValue()));
        timer = new javax.swing.Timer(1000, this);
        timer.start();
    }

    public void actionPerformed(ActionEvent event) {
        int x, y, size;
        Graphics paper = panel.getGraphics();
        x=random.nextInt(200);
        y = random.nextInt(200);
        size = random.nextInt(20);
        paper.fillOval(x,y, size, size);
    }

    public void stateChanged(ChangeEvent e) {
        int timeGap = slider.getValue();
        gapField.setText(Integer.toString(timeGap));
        timer.setDelay(timeGap);
    }
}
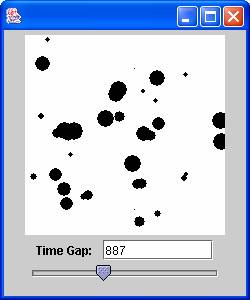
Figure 6.6 RainDrops
The program simulates raindrops of a random size falling on a sheet of paper. The user can alter the time between drops by dragging on the slider.
Every time a timer event happens, the program draws a randomly-sized circle,
at a random position. When the slider is moved, the current value of the
slider is displayed in a text field, and the speed of the timer is altered.
The slider range of 200 to 2000 was found by experimentation. The
program uses most of the classes we have examined, but there are two new
points:
util
library has been imported for Random.
Raindrops example, the current position of the knob is displayed in
a text field. What are the consequences of altering the initial position of
the knob in the call of JSlider constructor??
new is omitted, a
run-time error is produced, of type nullPointerException. Run-time errors
(i.e. bugs) are more problematic than compile-time errors; they are harder
to find, and they are more serious, because the program's execution is
halted.
J - such as JButton. There are
similarly-named classes in the AWT library, but without the J (such as
Button). A run-time error results if you use these classes. Remember the
J.
private, as in:
private int yourVariable;
private Random myVariable = new Random();
private instance variables
new for instantiation
import to allow easy use of libraries
JButton, JLabel, JTextField, Random, and Timer classes
1. Write a program which calculates the area of a rectangle. The dimensions should be input from text fields, and the result should be displayed in a text field. Ensure that the input fields are clearly labelled.
2. Write a program which produces a random number between 200 and 400 each time a button is clicked. The program should display this number, and the sum and average of all the numbers so far. As you click again and again, the average should converge on 300. If it doesn't, we would suspect the random number generator - just as we would be suspicious of a coin that came out heads 100 times in a row!
3. (a) Write a program which converts degrees Celsius to degrees Fahrenheit.
The Celsius value should be entered in a text field - use integer values.
Clicking a button should cause the Fahrenheit value to be displayed in
another text field. The conversion formula is:
f = (c * 9) / 5 + 32;
(b). modify the program so that the Celsius value is entered via a
slider, with its minimum set to 0, and its maximum set to 100.
(c) represent both the temperatures as long thin rectangles, to be drawn on after every 'change' event. Remember to clear the drawing area and to reset the drawing colour each time.
4. Write a program which calculates the volume of a swimming pool, and which
also displays its cross-section in a picture box. The width of the pool is
fixed at 5 metres and the length is fixed at 20 metres. The program should
have two sliders - one to adjust the depth of the deep end, and one to
adjust the depth of the shallow end. The minimum depth of each end is 1
metre. Redraw the pool in the stateChanged method. Choose suitable values for the maximum and minimum track bar values
at design time. The volume formula is:
v = averageDepth * width * length;
Figure 6.7 shows the cross-section.

figure 6.7 - pool
5. Write a program which displays changing minutes and seconds, representing them by two long rectangles: make the maximum width of the rectangles equal to 600 pixels to simplify the arithmetic (10 pixels for each minute and each second). Set the size of the frame to 700 pixels wide, and set the preferred width of the drawing panel to 700 pixels. Re-draw the two rectangles every second. Figure 6.8 shows a representation of 30 minutes and 15 seconds

fig 6.8 - Clock
The program should count up in seconds with a timer, and display the total seconds, and the time in minutes and seconds. In order to speed up testing the program, you should reduce the timer interval from 1000 milliseconds to say 200.
6. This question guides you through the writing of a geometry game:
(a) Write a program with two sliders which control the horizontal and
vertical position of a circle of 200 pixels diameter. Clear the screen and
re-draw the circle in the stateChanged method.
(b) add a third slider to control the diameter of the circle.
(c) What follows is based on the mathematical fact that a circle can be drawn through any three points. The program should initially display 3 points (each is a small filled circle). Good initial positions are (100,100), (200,200), (200,100) but you can add a small random number to them for variety. The player has to manipulate the circle until the circle goes through each point.